
Author: Ambuj Srivastava
Product: Semarchy Snowflake NativeApp v2025.1.X with embedded repository
-----------------------------------------
Need
The xDM Native App for Snowflake does not expose direct access to the Semarchy repository, so a Snowflake pipeline cannot load data into xDM the way it would load a normal table. To publish data from Snowflake into xDM, the pipeline instead has to call the xDM REST API - creating a load, inserting records against that Load ID, submitting the load, and cancelling it if something goes wrong.
This article walks through building that path end to end in Snowflake: custom functions and a stored procedure that call the xDM REST API to fetch a Load ID and create, submit, or cancel the load.
This article applies to Semarchy xDM Native App deployments on Snowflake with an embedded repository. This doesn't apply to deployments using Managed PostgreSQL for repository and data location on Snowflake.
Summarized Solution
The setup has two parts: a one-time configuration in xDM and Snowflake (API key, role, service user, network rule, secrets, and external access integration), and a set of Snowflake objects - three functions and one stored procedure - that call the xDM REST Load API.
Object | Type | Created in | Purpose |
sem_api_role | Role | Step 2 | Dedicated role granted the application's XDM_APP application role |
pat_token_user | Service user | Step 2 | Service account used to generate the PAT token |
semarchy_api_rule | Network rule | Step 3 | Allows egress to the xDM server on port 443 |
semarchy_api_key / semarchy_snowflake_pat_token | Secrets | Step 6 | Store the xDM API key and the PAT token used to authenticate REST calls |
semarchy_api_eai | External access integration | Step 7 | Binds the network rule and secrets so functions can call the xDM REST API |
create_semarchy_load | Function | Step 8 | Calls the xDM REST API to create a load and returns the Load ID |
submit_semarchy_load | Function | Step 9 | Submits a load for a given Load ID |
cancel_semarchy_load | Function | Step 10 | Cancels a load for a given Load ID, typically on error |
sp_load_person | Stored procedure | Step 11 | Orchestrates create → insert → submit, and cancels the load automatically on failure |
Detailed Solution
Prerequisites
- Admin privilege for the Semarchy xDM app
- Admin privilege on the Snowflake data location database to create UDFs and stored procedures
- Admin privilege on Snowflake to create users, roles, and secrets
- An integration job in Semarchy xDM to load the data into the entities
- Access to the source database and schema
Step 1: Create an API Key to Access xDM APIs
- Open Semarchy xDM as an admin, go to Welcome Page > Configuration > API Keys, and create a new API key.
- Make a note of the generated API key - it will be used later.
- Refer to the documentation to create an API key: https://semarchy.com/doc/semarchy-xdm/xdm/latest/Admin/security/api-keys.html#_create_an_apikey
Step 2: Create User and Roles
Open Snowflake Snowsight, select the admin role and the warehouse, data location database, and schema, then run the following in a worksheet:
-- 1. Create a Snowflake role dedicated to the application
CREATE OR REPLACE ROLE <sem_api_role>;
-- 2. Grant this role to the default main role of the application
GRANT APPLICATION ROLE <NativeAppName>.XDM_APP TO ROLE sem_api_role;
-- 3. Create a service user with the role created above
CREATE USER pat_token_user
  TYPE = SERVICE                                  -- specifies this is a service account
  DEFAULT_WAREHOUSE = <warehouseName>
  DEFAULT_ROLE      = <sem_api_role>
  DEFAULT_NAMESPACE = <DataLocationDB>.<DataLocationSchema>;
-- 4. Grant the role to the user
GRANT ROLE <sem_api_role> TO USER <pat_token_user>;
Step 3: Create a Network Rule
Create the network rule using Snowsight:
CREATE OR REPLACE NETWORK RULE semarchy_api_rule
  MODE = EGRESS
  TYPE = HOST_PORT
  VALUE_LIST = ('<xDMServerURL>:443');
Step 4: Generate a PAT Token
- From Snowflake Snowsight, navigate to “Governance & security” > “Users & roles”.
- Open pat_token_user from the list of users.
- Go to the Programmatic Access Token section and click “Generate Token”.
- Enter the required details, set the expiry period, and grant access.
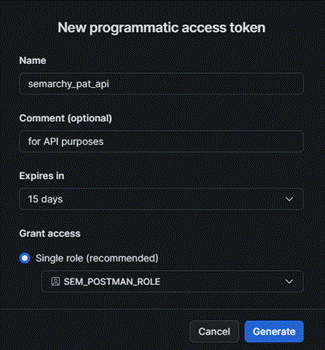
Figure 1: Generating a new programmatic access token in Snowsight.
Clicking Generate displays the PAT token - copy it, as it will be used later.
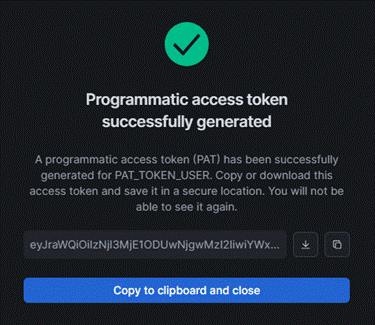
Figure 2: The PAT token is shown only once - copy it to a secure location before closing this dialog.
Step 5: Quick Test Using Postman
Open Postman to check that the REST API can be called using the PAT token and API key. The xDM Native App doesn't support Basic Authentication, so the test uses the Authorization and API-key headers instead.
Add the following headers:
Authorization: Snowflake Token="<PAT Token>"
API-key: <Semarchy API Key>
Note: Snowflake Token= is a fixed prefix to add in front of the PAT token, and the PAT token itself must be enclosed in double quotes.
Call any xDM REST API endpoint (for example, a record count) and execute the request. If a result is returned, the test is successful and the remaining steps can proceed.
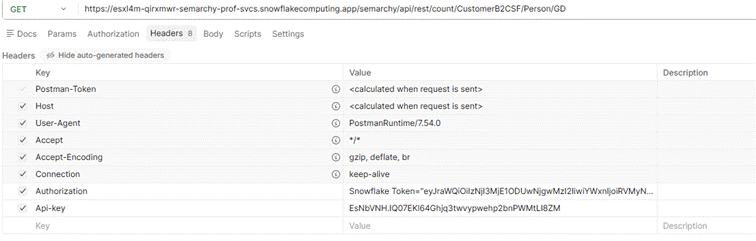
Figure 3: Example Postman request showing the Authorization and API-key headers.
Step 6: Create Secrets to Store the PAT Token and API Key
As a Snowflake admin, open a worksheet in Snowsight and execute the following:
-- 1. Grant permission to create secrets
GRANT CREATE SECRET ON SCHEMA <DataLocationDB.Schema> TO <AdminUser>;

-- 2. Secret for the xDM API key
CREATE OR REPLACE SECRET semarchy_api_key
  TYPE = GENERIC_STRING
  SECRET_STRING = '<xDM API Key>';

-- 3. Secret for the PAT token
CREATE OR REPLACE SECRET semarchy_snowflake_pat_token
  TYPE = GENERIC_STRING
  SECRET_STRING = 'Snowflake Token="<PAT-Token>"';
Warning: The xDM API key and PAT token both have an expiration date. Update the corresponding secret if a function starts returning an HTTP 401 error, or proactively once the token or key is close to expiring.
If the token or API key expires, the function returns an error similar to the one below:

Figure 4: Example error returned in Snowsight when the API key or PAT token has expired.
Step 7: Create the External Access Integration
Run the following in Snowsight to create the external access integration for the secrets created above:
CREATE OR REPLACE EXTERNAL ACCESS INTEGRATION semarchy_api_eai
  ALLOWED_NETWORK_RULES = (semarchy_api_rule)
  ALLOWED_AUTHENTICATION_SECRETS = (
    semarchy_api_key,
    semarchy_snowflake_pat_token
  )
  ENABLED = TRUE;
Step 8: Function to Create a Load
Because the xDM Native App doesn't expose semarchy_repository access, a custom function is needed to pass the secrets as headers to the REST API endpoint, along with the JSON payload.
The endpoint is:
<xDMServerURL>/semarchy/api/rest/loads/<DataLocation>
The JSON payload requires 3 parameters:
{
  "action": "CREATE_LOAD",
  "programName": "SNOWFLAKE_PIPELINE",
  "loadDescription": "Load from Snowflake task"
}
action: "CREATE_LOAD" is static; programName and loadDescription are user-defined. Create the function in Snowsight, under the data location database and schema:
CREATE OR REPLACE FUNCTION create_semarchy_load(
  action STRING,
  program_name STRING,
  load_description STRING
)
RETURNS NUMBER
LANGUAGE PYTHON
RUNTIME_VERSION = '3.11'
PACKAGES = ('requests')
HANDLER = 'create_load'
EXTERNAL_ACCESS_INTEGRATIONS = (semarchy_api_eai)
SECRETS = (
  'api_key' = semarchy_api_key,
  'auth_token' = semarchy_snowflake_pat_token
)
AS
$$
import requests
import _snowflake

def create_load(action, program_name, load_description):
    url = "<xDMServerURL>/semarchy/api/rest/loads/<DataLocation>"
    api_key = _snowflake.get_generic_secret_string("api_key")
    auth_token = _snowflake.get_generic_secret_string("auth_token")

    headers = {
        "Authorization": auth_token,
        "API-key": api_key,
        "Content-Type": "application/json",
         "Accept": "application/json"
    }

    payload = {
        "action": action,
        "programName": program_name,
        "loadDescription": load_description
    }

    response = requests.post(url, headers=headers, json=payload, timeout=30)

    if response.status_code < 200 or response.status_code >= 300:
        raise Exception(f"Semarchy API failed: {response.status_code} - {response.text}")
    result = response.json()
    return int(result["loadId"])
$$;
To test the function:
SELECT create_semarchy_load('CREATE_LOAD', 'curl', 'load');This returns the Load ID, which is used by the next function to submit the load.
Step 9: Function to Submit the Load
A second custom function submits the load, using the same secrets and a Load ID as input.
The endpoint requires the Load ID generated in Step 8:
<xDMServerURL>/semarchy/api/rest/loads/<DataLocation>/{load-id-or-load-name}The JSON payload requires 3 parameters:
{
  "action": "SUBMIT",
  "jobName": "INTEGRATE_DATA",
  "submitAs": "sarah.steward"
}
action: "SUBMIT" is static; jobName comes from the Jobs configuration, and submitAs is optional. Create the function under the data location database and schema:
CREATE OR REPLACE FUNCTION submit_semarchy_load(
  load_id NUMBER,
  job_name STRING,
  submit_as STRING
)

RETURNS VARIANT
LANGUAGE PYTHON
RUNTIME_VERSION = '3.11'
PACKAGES = ('requests')
HANDLER = 'submit_load'
EXTERNAL_ACCESS_INTEGRATIONS = (semarchy_api_eai)
SECRETS = (
  'api_key' = semarchy_api_key,
  'auth_token' = semarchy_snowflake_pat_token
)

AS
$$
import requests
import _snowflake

def submit_load(load_id, job_name, submit_as):
    base_url = "<xDMServerURL>/semarchy/api/rest/loads/<DataLocation>"
    url = f"{base_url}/{int(load_id)}"
    api_key = _snowflake.get_generic_secret_string("api_key")
    auth_token = _snowflake.get_generic_secret_string("auth_token")

    headers = {
        "Authorization": auth_token,
        "API-key": api_key,
        "Content-Type": "application/json",
         "Accept": "application/json"
    }

    payload = {
        "action": "SUBMIT",
        "jobName": job_name,
        "submitAs": submit_as
    }

    response = requests.post(url, headers=headers, json=payload, timeout=30)

    if response.status_code < 200 or response.status_code >= 300:
        raise Exception(f"Semarchy submit failed: {response.status_code} - {response.text}")
    return response.json()
$$;
To test the function:
SELECT submit_semarchy_load(<loadIDFromStep8>, '<jobName>', '<submitAs>');
This returns the load submit status response.
Step 10: Function to Cancel the Load
This function automatically cancels a load if there's an error during the create or submit steps.
The endpoint again requires the Load ID:
<xDMServerURL>/semarchy/api/rest/loads/<DataLocation>/{load-id-or-load-name}The JSON payload requires 1 parameter:
{
  "action": "CANCEL"
}
Create the function under the data location database and schema:
CREATE OR REPLACE FUNCTION cancel_semarchy_load(
  load_id NUMBER
)
RETURNS VARIANT
LANGUAGE PYTHON
RUNTIME_VERSION = '3.11'
PACKAGES = ('requests')
HANDLER = 'cancel_load'
EXTERNAL_ACCESS_INTEGRATIONS = (semarchy_api_eai)
SECRETS = (
  'api_key' = semarchy_api_key,
  'auth_token' = semarchy_snowflake_pat_token
)
AS
$$
import requests
import _snowflake

def cancel_load(load_id):
    base_url = "<xDMServerURL>/semarchy/api/rest/loads/<DataLocation>"
    url = f"{base_url}/{int(load_id)}"
    api_key = _snowflake.get_generic_secret_string("api_key")
    auth_token = _snowflake.get_generic_secret_string("auth_token")

    headers = {
        "Authorization": auth_token,
        "API-key": api_key,
        "Content-Type": "application/json",
         "Accept": "application/json"
    }

    payload = {
        "action": "CANCEL"
    }


    response = requests.post(url, headers=headers, json=payload, timeout=30)

    if response.status_code < 200 or response.status_code >= 300:
        raise Exception(f"Semarchy cancel failed: {response.status_code} - {response.text}")

    try:
        return response.json()
    except Exception:
        return {
            "status": "CANCELLED",
            "httpStatus": response.status_code,
            "responseText": response.text
        }
$$;
To test the function:
SELECT cancel_semarchy_load(<LoadId>);
Step 11: Stored Procedure to Create, Submit, and Cancel a Load
The three functions above are enough to manage a load, but wrapping them in a stored procedure makes create, insert, submit, and cancel a single call. The payloads for create, submit, and cancel are hardcoded in the procedure and can be adjusted to fit business requirements.
The procedure takes a single argument, p_source_sql, the fully qualified name of the source. It includes a sample INSERT statement into the SD_PERSON table, which can be modified as needed:
CREATE OR REPLACE PROCEDURE sp_load_person(
  p_source_sql STRING
)
RETURNS VARIANT
LANGUAGE SQL
EXECUTE AS CALLER
AS
$$
DECLARE
  v_load_id NUMBER;
  v_submit_response VARIANT;
  v_cancel_response VARIANT;
  v_insert_sql STRING;
BEGIN
  v_load_id := create_semarchy_load(
    'CREATE_LOAD',                -- mandatory value
    'SNOWFLAKE_PIPELINE',         -- program name
    'Load from Snowflake task'    -- load description
  );


  BEGIN
    v_insert_sql :=
      'INSERT INTO sd_person
       (
         b_loadid,
         b_pubid,
         b_classname,
         b_sourceid,
         first_name,
         last_name,
         source_email
       )

       SELECT
         ' || v_load_id || ' AS b_loadid,
         ''CRM'',
         ''Person'' as b_classname,
         id as b_sourceid,
         firstname,
         lastname,
         email
       FROM (' || p_source_sql || ') src';
    EXECUTE IMMEDIATE v_insert_sql;

    v_submit_response := submit_semarchy_load(
      v_load_id,       -- variable from create_semarchy_load
      'LoadPerson',     -- job name
      'semadmin'        -- submitAs
    );


    RETURN OBJECT_CONSTRUCT(
      'status', 'SUCCESS',
      'loadId', v_load_id,
      'submitResponse', v_submit_response
    );

  EXCEPTION
    WHEN OTHER THEN
      v_cancel_response := cancel_semarchy_load(v_load_id);
      RETURN OBJECT_CONSTRUCT(
        'status', 'FAILED_AND_CANCELLED',
        'loadId', v_load_id,
        'errorCode', SQLCODE,
        'errorMessage', SQLERRM,
        'errorState', SQLSTATE,
        'cancelResponse', v_cancel_response
      );
  END;
END;
$$;
Step 12: Grant Usage Permission on the Stored Procedure
Grant the USAGE permission to the xDM application, if it doesn't already have it:
GRANT USAGE ON PROCEDURE sp_load_person(VARCHAR()) TO APPLICATION <NativeAppName>;
Step 13: Call the Procedure
Run the following to execute the stored procedure:
CALL sp_load_person('<SourceDB>.<SourceSchema>.<SourceTable>');Check Latest External Load and Latest Integration Batches under xDM > Management > Data Location to confirm the execution and data consolidation steps.