Applies to: Semarchy xDI Production Analytics 2025.1.x on Tomcat 9.0
Author: Jean-Edouard Mayette & Michael Turchi
This article explains how to configure Semarchy xDI Production Analytics to authenticate through Single Sign-On (SSO), using Tomcat as the application server. Two authentication methods are covered: OpenID Connect and SAML v2.
Note: This example uses the Keycloak 26.2.5 Identity Provider. Configuration adjustments may be necessary for other SSO providers.
Before you start
- Semarchy xDI Production Analytics 2025.1.x deployed on Tomcat 9.0
- An SSO Identity Provider (Keycloak is used in this example)
- Choose one authentication method: OpenID Connect (Section 1) or SAML v2 (Section 2)
Method 1: OpenID Connect
Configure Tomcat
Add the jar library
- Download the latest Semarchy tool jar from the Semarchy team or website.
- Add the jar
com.semarchy.tool.jee.tomcat-9.0.5.jarto thetomcat/confdirectory, or add it to the Tomcat classpath in the filesetenv.bat/setenv.sh.
Activate logging (optional)
To activate additional logging on the Tomcat side, add the following lines to tomcat/conf/logging.properties:
org.apache.catalina.core.ContainerBase.[Catalina].[localhost].[/semarchy-xdi-analytics].level = ALLorg.apache.catalina.realm.level = ALLorg.apache.catalina.realm.useParentHandlers = trueorg.apache.catalina.authenticator.level = ALLorg.apache.catalina.authenticator.useParentHandlers = true com.semarchy.tool.jee.tomcat.level = ALL
Remove these lines once your configuration is working.
Create the Tomcat valve for SSO
Create the file conf/Catalina/localhost/semarchy-xdi-analytics.xml:
<?xml version="1.0" encoding="UTF-8"?>
<Context>
<Valve className="com.semarchy.tool.jee.tomcat.OpenIdConnectAuthenticator"
disableCVE201917563="false"
providers="[{
name: 'KeyCloack',
issuer: 'http://localhost:8080/realms/viph-sim',
clientId: 'xdi-analytics',
clientSecret: 'gNvH2Fv0ennGVgOaEqbGflBOcSiVtv0L'
}]"
usernameClaim="email"
hostBaseURI="http://localhost:8081"
noForm="true"
groupClaim="groups"
groupSeparator=","
landingPage="/"
changeSessionIdOnAuthentication="false"
roleMappingEnabled = "true"
keepMappedRoles="false"
keepUnmappedRoles="false"
/>
<Realm className="com.semarchy.tool.jee.tomcat.OpenIdConnectRealm" />
</Context>You will need to adapt the attributes above:
- providers: Depends directly on the SSO provider — some require additional sub-attributes such as
tokenEndpointAuthMethod. Examples for common providers:
providers="[
{
name: Auth0,
issuer: https://example.auth0.com/,
clientId: 7x9e5ozKO0JZc6JdriadVEvLpodz0182,
clientSecret: jBmfqhKmBYe-zvcQCju8MT3nfP4g6mUvex1BdpH8-Tz5mx7x8brpmQfgw_Nyu4Px
},
{
name: Google,
issuer: https://accounts.google.com,
clientId: 234571258471-9l1hgspl0qtuqohn80gat3j0vqo61cho.apps.googleusercontent.com,
clientSecret: FRQFgCcSzyurnNJG-xVvMs8L,
extraAuthEndpointParams: {
hd: example.com
}
},
{
name: 'Amazon Cognito',
issuer: https://cognito-idp.us-east-1.amazonaws.com/us-east-1_AGKCjG3dQ,
clientId: lz63q5p6qfn1ibjup0hn7jwka,
clientSecret: 1mz5n48ockpvqfirfkei7chgbo223ndgiblorrf4ksmcomr2itec
},
{
name: 'Microsoft Azure AD',
issuer: https://sts.windows.net/45185e72-2ac1-4371-acec-d0b6d4469ce2/,
clientId: 817343e7-2f24-4951-acd1-8285665280c3,
clientSecret: WLvE8nEz0zHOxrv1XrVLSzMd21URsx4i6owlv9059wk=
},
{
name: 'Microsoft Azure AD 2',
issuer: https://login.microsoftonline.com/45185e72-2ac1-4371-acec-d0b6d4469ce2/v2.0,
clientId: 817343e7-2f24-4951-acd1-8285665280c3,
clientSecret: PayteUNZ4142+^kv(FWv42%,
tokenEndpointAuthMethod: client_secret_post
},
{
name: Okta,
issuer: https://example.okta.com,
clientId: 0oa16n2pagwGjnf6w2z9,
clientSecret: 7P_3LuCWhdl4QGoF38PxNDCoXRQB2QznVXf1s4CF
},
{
name: empowerID,
issuer: https://sso.empoweriam.com,
configUrl: https://sso.empoweriam.com/oauth/.well-known/openid-configuration,
clientId: 8c3e74b6-7dfb-451f-ac2f-219deb353a70,
clientSecret: 17aebdf6-1177-4a5d-bff3-e33b7a8c0223,
tokenEndpointAuthMethod: client_secret_post,
usernameClaim: attrib.email
}
]"- usernameClaim: Depends on the user login credential used (
id,user,email). - additionalScopes: List of scopes sent by the SSO in the token ID. The application itself does not need any additional scopes.
- roleMappingEnabled, keepMappedRoles, keepUnmappedRoles: Only needed if you want to remap the group names to Production Analytics roles.
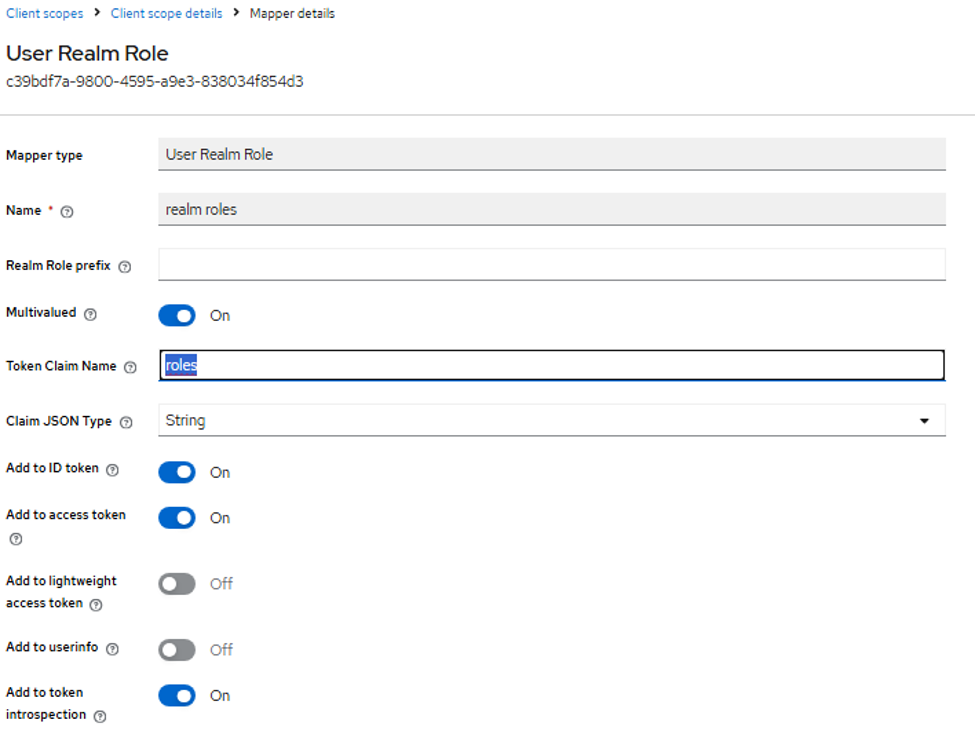
- groupClaim: This configuration is based on SSO Groups mapping, but you can use SSO Roles mapping instead by changing
groupClaim="groups"togroupClaim="roles", whererolesis the name of the scope returned by your provider containing the roles (adjust the token claim name in the role mapper accordingly).
Other attributes may be required depending on the provider — see the tomcat-oidcauth documentation for the full list.
Create role mapping (optional)
To map existing groups or roles to Production Analytics roles, add the file conf/roles-mapping.properties:
admin = analyticsConnect,analyticsAdmin user = analyticsConnect,analyticsSessionConsult
Here, admin and user are the names of the existing groups or roles.
Configure TLS for Tomcat
If you encounter a PKIX error indicating a missing certificate, add your certificate to tomcat/conf/server.xml.
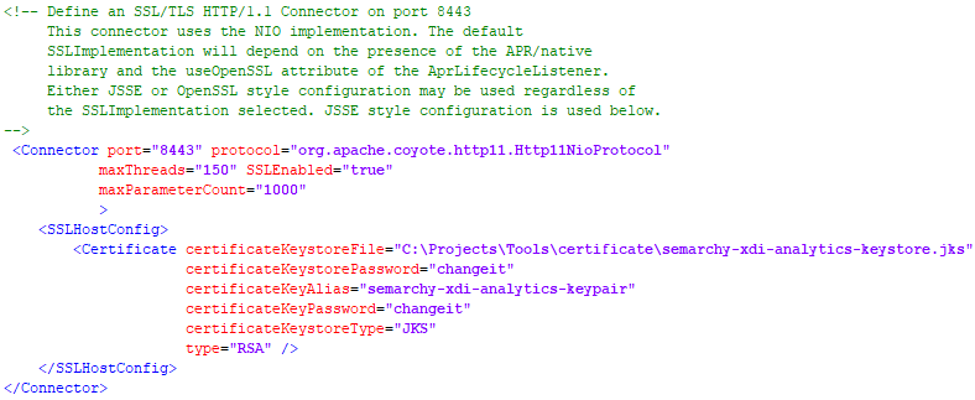
See TLS security for xDI for more information.
Configure the SSO provider
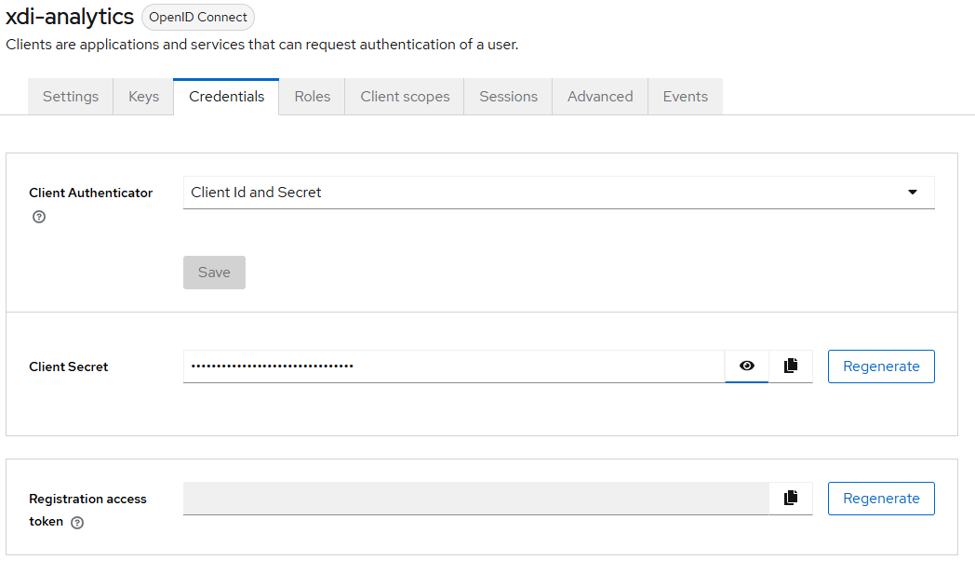
Create the OIDC client application
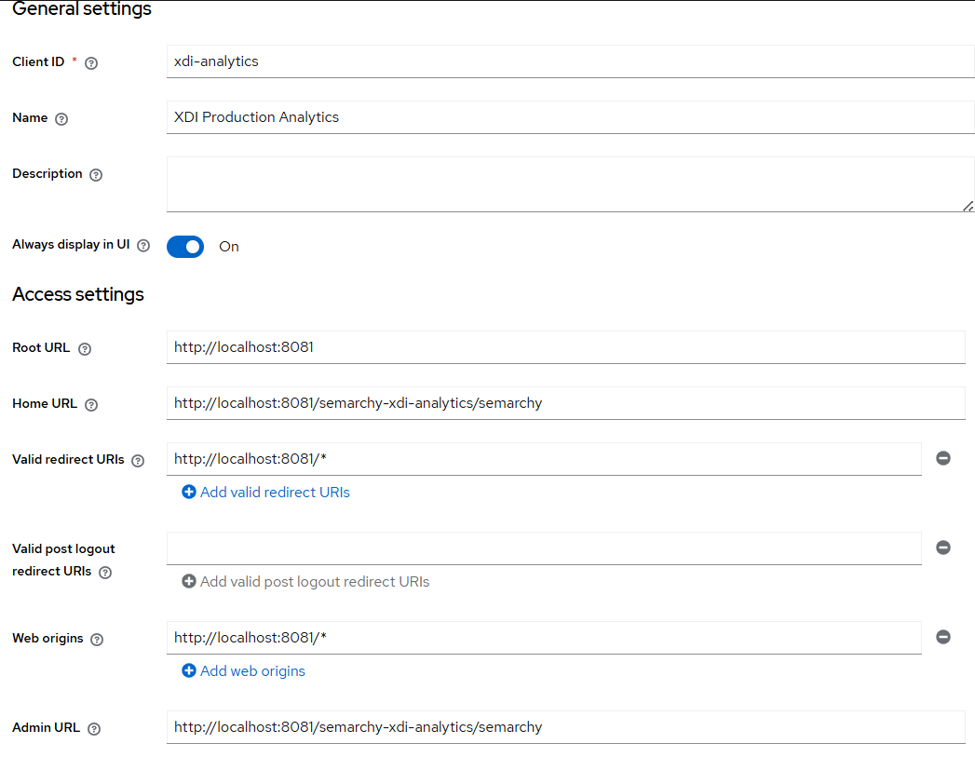
Important settings:
- Client ID: The client ID used in the Tomcat valve configuration.
- Home URL (or Reply URL): The URL of your Production Analytics server home — replace
localhostwith your actual host. - Valid redirect URIs: Can be limited to
http://host:port/semarchy-xdi-analytics/*. - Client secret: Generate a client secret to be used by the Tomcat valve.
Create and assign a client scope
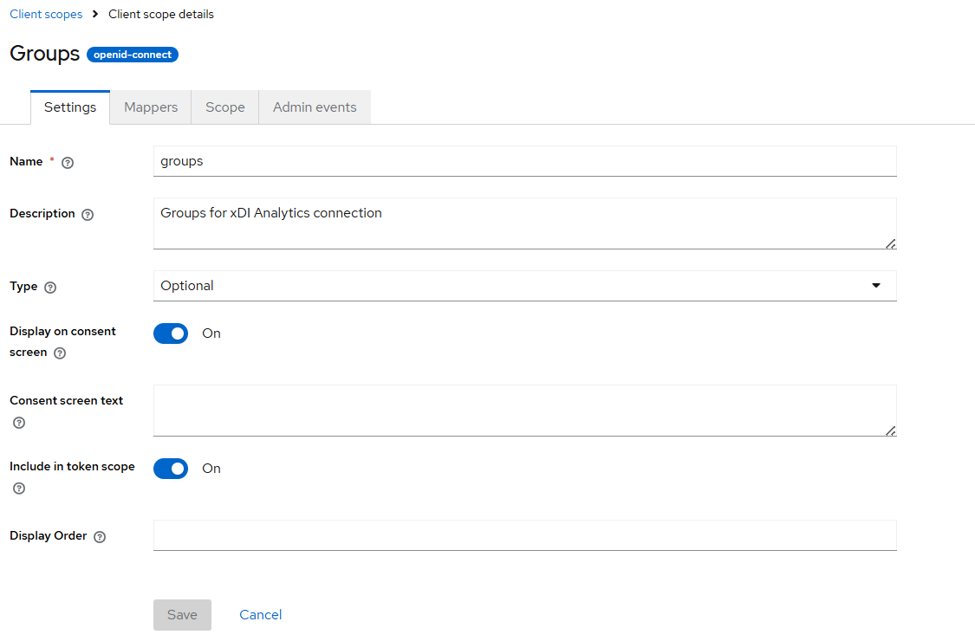
- Create a client scope called
groupsorroles, depending on whether you want to manage user rights by group or role. Make sure to include it in the token scope. The exact name doesn't matter functionally — it's a best practice — but it must match the value defined in thegroupClaimattribute of your valve configuration. - Define a mapper on that client scope to assign the value — this can be Group Membership or Realm/Client roles.
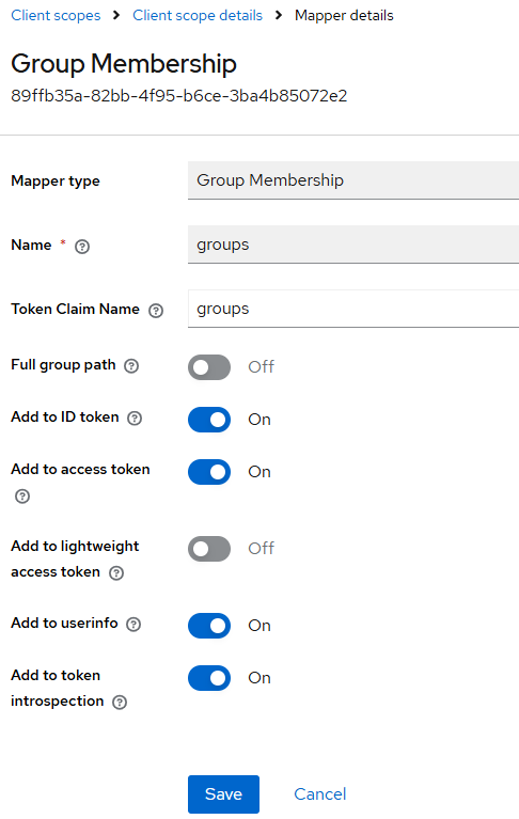
- Assign the client scope to the client application.

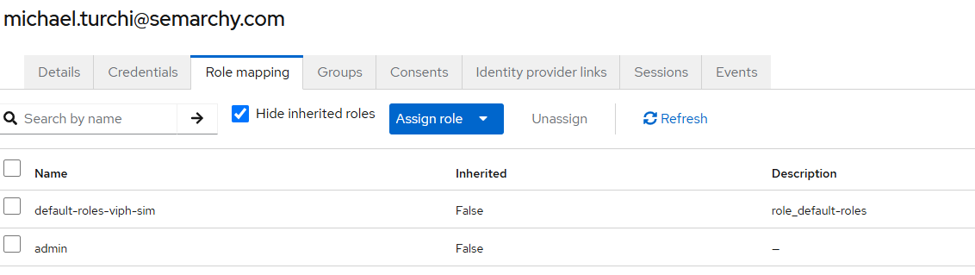
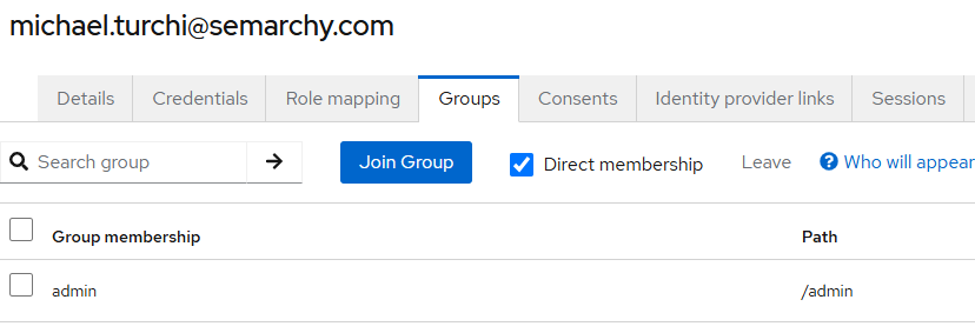
- Ensure the user belongs to the correct groups or roles.
Method 2: SAML v2
Configure Tomcat
Add the jar libraries
- Download the latest Fediz plugin with dependencies from Apache CXF Fediz.
- Download the latest Semarchy tool jar from the Semarchy team or website.
- Add
com.semarchy.tool.jee.tomcat-9.0.5.jarto thetomcat/confdirectory, or add it to the Tomcat classpath insetenv.bat/setenv.sh.
Activate logging (optional)
Add the following lines to tomcat/conf/logging.properties:
org.apache.catalina.core.ContainerBase.[Catalina].[localhost].[/semarchy-xdi-analytics].level = ALL
org.apache.catalina.realm.level = ALL
org.apache.catalina.realm.useParentHandlers = true
org.apache.catalina.authenticator.level = ALL
org.apache.catalina.authenticator.useParentHandlers = true com.semarchy.tool.jee.tomcat.level = ALL
Remove these lines once your configuration is working.
Create the Tomcat valve for SSO
Create the file conf/Catalina/localhost/semarchy-xdi-analytics.xml:
<?xml version="1.0" encoding="UTF-8"?>
<Context>
    <Valve className="com.semarchy.tool.jee.tomcat.FederationAuthenticator"
        rolesMappingPathName="/conf/roles-mapping.properties"
        configFile="conf/fediz_config.xml"
        roleMappingEnabled = "true"
        keepMappedRoles="false"
        keepUnmappedRoles="false"
       />
</Context>
You will need to adapt the attributes above:
- configFile: Location of your Fediz configuration file (see below).
- roleMappingEnabled, keepMappedRoles, keepUnmappedRoles, rolesMappingPathName: Only needed if you want to remap the group/role names to Production Analytics roles on the Tomcat side.
Create the Fediz configuration
Create the file conf/fediz_config.xml:
<?xml version="1.0" encoding="UTF-8" standalone="yes"?>
<FedizConfig>
  <contextConfig name="/semarchy-xdi-analytics">
    <audienceUris>
      <audienceItem>http://localhost:8081/semarchy-xdi-analytics</audienceItem>
    </audienceUris>
    <signingKey keyAlias="semarchy" keyPassword="semarchy">
        <keyStore file="conf/keystore.jks" password="semarchy" type="JKS" />
    </signingKey>

    <certificateStores>
            <trustManager>
                <keyStore file="C:\Keycloack\keycloak-realm.pem" type="PEM" />
            </trustManager>
    </certificateStores>
    <trustedIssuers>
      <issuer certificateValidation="PeerTrust" />
    </trustedIssuers>
    <protocol xmlns:xsi="http://www.w3.org/2001/XMLSchema-instance"
              xsi:type="samlProtocolType" version="2.0">
        <disableDeflateEncoding>true</disableDeflateEncoding>
        <doNotEnforceKnownIssuer>true</doNotEnforceKnownIssuer>
        <issuer>http://localhost:8080/realms/viph-sim/protocol/saml</issuer>
        <roleDelimiter>,</roleDelimiter>
        <roleURI>Role</roleURI>
        <signRequest>true</signRequest>
    </protocol>
  </contextConfig>
</FedizConfig>
You will need to adapt the attributes above:
- audienceUris: Mandatory. Must match the home URI of your Production Analytics instance and the
AudienceRestrictionset on the SAML token. - signingKey: Only needed if your SAML token is signed. Specify the location of a JKS/PEM file containing the SAML signature key — download it from your SSO or install it manually into a JKS or PEM file in the Tomcat
conffolder. - certificateStores/trustManager: Only needed if your SAML token is signed. Specify the location of the public certificate of your SSO realm — download it from your SSO or install it manually into a JKS or PEM file in the Tomcat
conffolder. - protocol/disableDeflateEncoding: Only needed if your SAML token is signed.
- protocol/doNotEnforceKnownIssuer: Whether to skip enforcing that the issuer of the SAML response is a known value. Default is
false(enforced). - issuer: The URL of the IdP to which unauthenticated requests are redirected.
- roleURI: Must match the name of the SAML attribute used to map roles/groups into the SAML token. Tip: you can find the exact name by inspecting the token.

- signRequest: Only needed if your SAML token is signed.
Some SSO providers require a reply URL. In that case, add a <reply> element under <protocol> representing the entry URL of your Production Analytics instance:
<protocol xmlns:xsi="http://www.w3.org/2001/XMLSchema-instance"
              xsi:type="samlProtocolType" version="2.0">
        <reply>https://localhost:8081/semarchy-xdi-analytics/semarchy</reply>
Other attributes may be required depending on the provider — see the Fediz configuration documentation for the full list.
Create role mapping (optional)
To map existing groups or roles to Production Analytics roles, add the file conf/roles-mapping.properties (the file name must match the value defined in rolesMappingPathName on the Tomcat valve):
admin = analyticsConnect,analyticsAdminuser = analyticsConnect,analyticsSessionConsult
Here, admin and user are the names of the existing groups or roles.
Configure the SSO provider
Create the SAML v2 client application
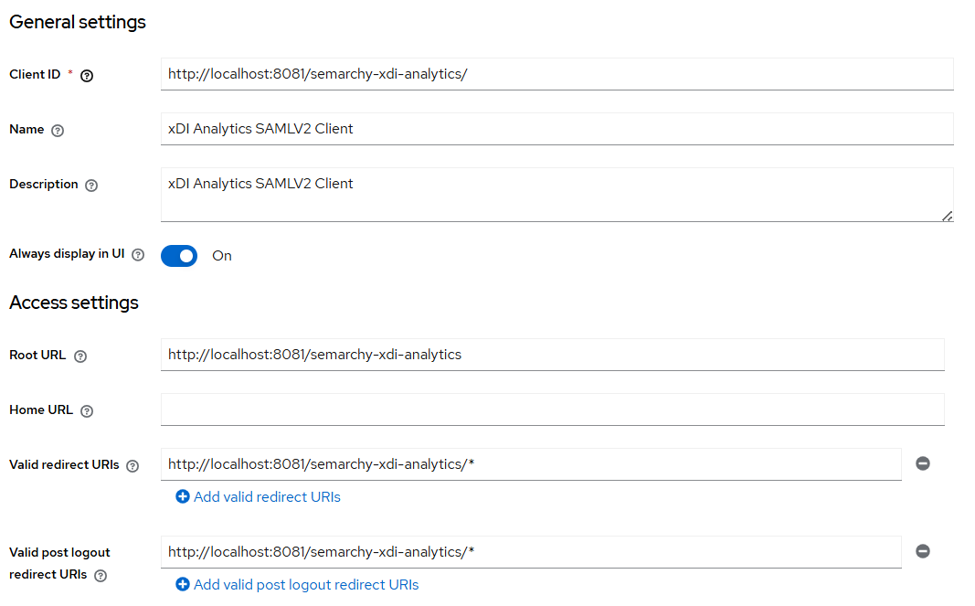
Important settings:
- Client ID: When using Keycloak, must match the
audienceURIdefined in the Fediz config, with a trailing slash. With other SSO providers, you can define the audience directly in a separate configuration. - Root URL: The URL of your Production Analytics server home — replace
localhostwith your actual host. - Valid redirect URIs: Can be limited to
http://host:port/semarchy-xdi-analytics/*. - Valid post logout URIs: Can be limited to
http://host:port/semarchy-xdi-analytics/*. - Reply URL (if required by your SSO):
http://analytics_host:port/semarchy-xdi-analytics/semarchy.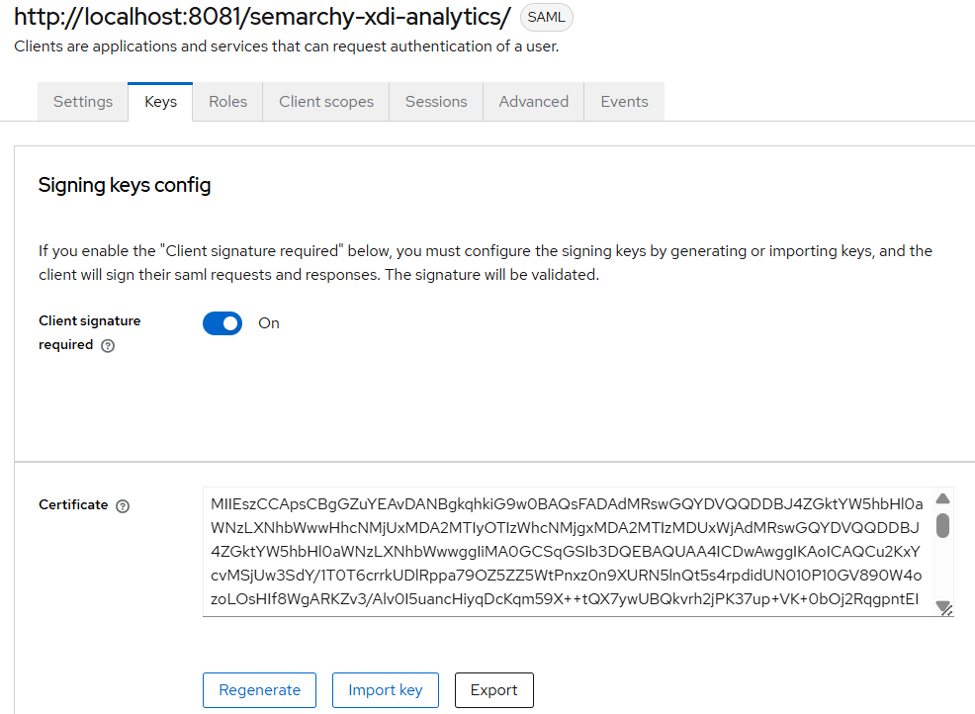
- If you want to sign your token, define a key on the client application and export it to a PEM/JKS file, or import an existing JKS/PEM file.
Create and assign a client scope
- To define the Production Analytics roles for each user, add a SAML attribute that maps those roles — this can use existing roles or groups. You can use an existing scope or create a new one.
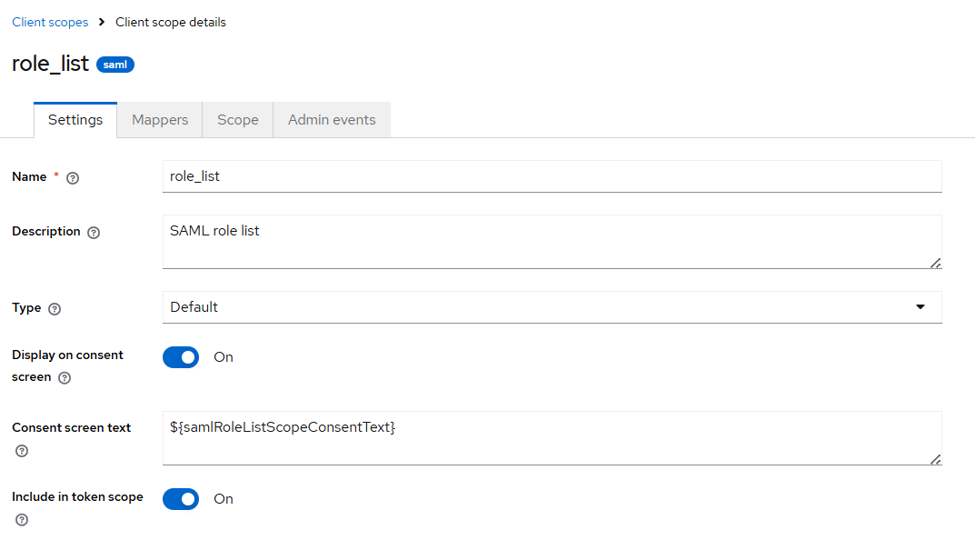
- Define a mapper depending on whether you want to use groups or roles.
 Or
Or The mapper name must match the value defined in the
 roleURIelement of your Fediz config — this value can also be found in the SAML token itself. For groups:
For roles:
- Once the scope is created, assign it to your client application.
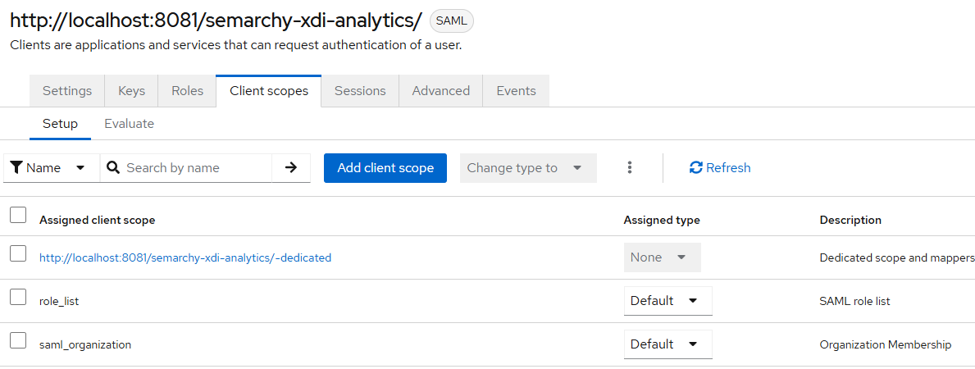
- Ensure the user belongs to the correct groups or has the correct roles.

or