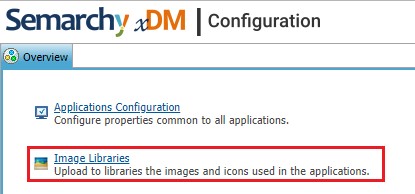
The Image Libraries editor, available in Semarchy Configuration, allows administrators to view and manage the image libraries.
This article describes how to add new images in Image Libraries. Images can be used in Data Application as Entities icons or image for Business Views (and menu shortcuts) and as icons in Forms or Collection. Images are also used to customize Data Applications Logo, Favicon, Cover, and Avatar.
Add images to the Image Libraries
Image Libraries are created and modified using file import. You can import two types of files:
- One or several individual image files
- Zip files, into which images are organized into folders
| To find quickly your images when configuring your Data Model, the folder and the image names have to be as significant as possible to allow you to find them with the Image Libraries search feature. |
To import images
- Connect to the Configuration module using your user name and password or your single sign-on profile.

- Open the Image Libraries editor.
- Click the Import Image Library button. The import dialog opens.
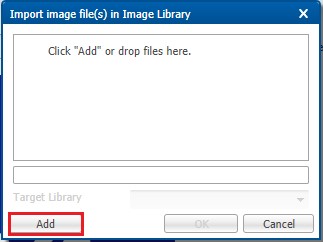
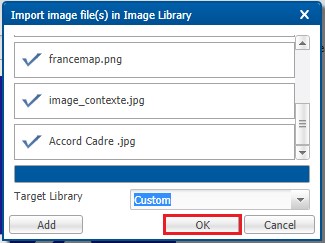
- Drop either a Zip file or multiple image files into the dialog, or click Browse to select a Zip file or multiple image files.
- If you import image files, select the Target Library for these images. Select Create a New Library to create a new library for these images.
- If you import a Zip file:
- One library is created for each folder at the root of this archive
- Images from each folder are imported into the library created for this folder.
| Note: Exporting images creates a Zip file which also contains one folder per library |
- Click OK to import the images.
Newly uploaded images are now available for your applications.